
CANON MG3600 Wireless Setup – If you have bought a Canon PIXMA MG3600 printing machine recently for your home or office use and are unsure on how to connect canon mg3600 printer to wifi, then read this article to find out everything you need to know about it.
Then the first thing you require to do is to unpack the box and take out and arrange all the parts on the table. Connect the printer with a power source and then start with connecting Canon MG3600 to the wifi/computer.
Start with connecting all the wires according to the instructions in the printer manual. You can connect your devices with an automatic connection button: WPS. This will allow both the devices such as printers and computers to connect with each other to your network without the requirement to enter a password.
Canon MG3600 Wireless Setup – WPS Connection Method
If your access point has a WPS button, then the ‘WPS Connection Method’ is the best method for you. This method is a very easy way to connect Canon MG3600 Printer To Wifi/Computer. You just need to follow the following instructions carefully to set up the connection:
-
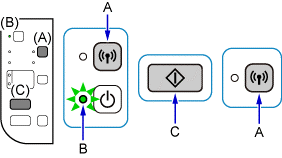
Ensure that the printer is on and that the WPS button on the wireless router is accessible.
-
Press and hold the Wi-Fi button on the printer until the ON light flashes.
-
Press the “Black” button, then press the “Wi-Fi” button.
-
Ensure that the Wi-Fi light flashes quickly and the ON light is lit. Next, press the WPS button on your access point within a couple of minutes.
-
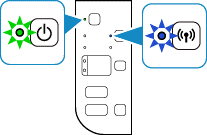
Once you’re done, you will see that the blue Wi-Fi light on the printer will continue flashing while searching.
- Also, both the Power and Wi-Fi lights will flash when connecting to the access point.
- After the printer gets successfully connected to the wireless, the Power and Wi-Fi lights will stop flashing and remain lit.
-
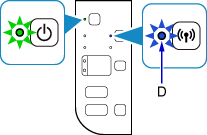
Once you’re done with all the steps, make sure that the Wi-Fi light and the ON light are lit.
Once you’ve carried out the above procedure, the network connection setup will be completed. However, if your device still does not get connected, then try out this next method to complete the canon mg3600 setup process.
Standard Connection Method For Canon mg3600 Setup
If your access point doesn’t have the WPS feature, then follow the instructions given below to connect Canon MG3600 Printer To Wifi/Computer
-
Click on “Start Setup” when you see the initial screen display.
-
The software will check if the driver needs to be updated. Wait a few minutes for the procedure to complete; the download will start automatically if it needs updating.
-
Select your region and country, and then click “Next”.
-
When the dialog box appears, if you accept the terms and conditions of the license agreement, click “Yes”.
-
You will be asked if you want to take part in the Extended Survey Program. Click “Agree” if you want to participate; otherwise, click “Do not agree”.
-
Click “Next” to allow the Install Wizard Process to continue.
-
Select “Wireless LAN Connection” and then tap “Next”.
-
Choose “Connect via wireless router”, then just click “Next”.
-
Ensure that your printer is turned on, and then hit “Next”.
-
Make sure that the option “Setting printer could not be found on the list” is selected, then tap “Next”.
-
The setup guide will open on your screen. Follow the instructions on the screen carefully.
-
Wait for some time while the setup discovers the printer.
-
Once the setup is completed, click on “Next”.
-
Finally, just click “Exit” to finish the setup process.
Once you’ve completed all these steps, you should be able to understand how to connect canon MG3600 printer to Wifi/computer. You should be able to print successfully with your printer, but even after following all the steps, if you still face difficulties with printer setup, then you can get in touch with our technical support by live chat or calling us to get your problem solve. These master experts are accessible throughout the day to give solutions to all your concerns and queries.
Troubleshooting Common Issues and Solutions

-
Printer Not Found:
- Check that the printer is powered on and Wi-Fi is enabled.
- Move the printer closer to the router to improve the signal strength.
-
Connection Fails:
- Restart your printer and router, then attempt the connection process again.
- Make sure your printer’s firmware is updated.
-
Signal Issues:
- For weak signals, try repositioning your printer and router, ideally placing them in prominent locations without obstructions.
-
Multiple Devices:
- If you intend to connect multiple devices, ensure they are all on the same Wi-Fi network as the printer.
-
Resetting Wi-Fi Settings:
- If all else fails, reset the printer’s Wi-Fi settings by pressing the Wi-Fi button until the alarm light flashes twice. This will reset the network configurations.
By following this guide, you should be able to successfully connect your Canon MG3600 printer to your Wi-Fi network.
You can also watch our video to solve your problem very easily:
How To Connect Canon MG3600 Printer to WiFi


